
|
|
|
|
|
|
|
|
|
|
|
|
|||

|
|||
Tuesday, August 31, 2010
DnD Red Box Mini-Review
Friday, August 27, 2010
Sneak Peak : Heroscape Dragon Figure Conversion

Here is a Sneak peak of something I was working on while my interwebs was down. Its a heroscape dragon figure that I'm converting to become a "classic" monster manual White Dragon. While it won't be identical its close enough to the picture in the original MM for my tastes. I plan on converting a few of these to the various color dragons for use with my DnD games. I've got plenty of them to work with after all!
The material I used so far is non other than "hot glue". When I do the full write up I'll describe the process and tools I used. There were some aspects that turned out well and some others that did not so I'll likely revisit those areas and fix them before my full post.
Hope you enjoyed this post and thanks for stopping by!
Wednesday, August 25, 2010
Make Your Own Elevation or Depth Game Board

Hey Everyone! Now that my connection to the "series of tubes" is working again here is one of the articles I've been working on. Its an article on how you can create your very own Elevation or Depth Game Board out of acrylic pieces on the cheap. The game boards I made are similar to the commercial product from the nice people over at http://battletier.com/ called Combat Tier. I believe their basic set is about $29.99 and they have expansions you can use to expand your set. It appears to be a worth while accessory, however with my budget and my DIY attitude, I figured I could make something similar for a bit cheaper and more custom for my gaming needs. If you don't want to spend the time making this yourself then the Combat Tier is right up your ally.
The game boards I created were actually used this past weekend along with my other elevation depth markers. My players were in a demi-plane of air and were traveling around via fly spells looking for anything that wasn't blue sky and clouds! To make a long story short, pteranodon's were encountered and turned into undead mounts, then griffon's were encountered and they too were turned into undead mounts, then there was a brief battle with one of the "Wizard's Three" (a recent set of villains), a chase through the air, an escape of the Wizard through a portal to yet another demi-plane and the chasing party members almost running head on into an invisible wall of force that was in their flight path. The boards worked pretty good even if the rules were somewhat clumsy. I think Gabe from Penny Arcade had it right to make up his own ruleset for his battling free fall into the abyss. (which btw you could use these boards for!) So if you want to see how to make your own boards, some of the things I did for "expansions", photos and a video on "solvent welding" after the jump!
Monday, August 23, 2010
My Interwebs is Down! Then Up! AT&T Sucks!

Last week my DSL went out completely for a day. I called and the service reps indicated that there was an "outage", but no details, and it should be fixed between 48-72 hrs. Around Friday the service came back up for about an hr or two, then went offline again, then back up. Its been intermittent for good 3-4 days now. When it is back up the speed is horrible, just horrible. When I run a speed test via speedtest.net I get 0.20 mbps download and 0.10 mbps upload. I really can't do much, video is so choppy its agravating, trying to post articles is a pain as I'll be finishing and then only to find out the connection is again down and so it only saved about 1/3 of the article.
So that's what I've been doing and why there haven't been any updates in a bit. (Not even sure if this one will make it) but I've been modeling/sculpting a bit and documenting a few "how tos" for you all to view once AT&T gets its shit together or I get to the point where I switch entirely. As this is still going on. So far I've refused to be one of "those guys" down at the starbucks (i hate coffee anyways) who brings his whole office and sets up shop in the corner.
Anyways. Did DM/GM a session of dnd again this weekend and it was another good session with my players exploring a demi plane of air and their trying to get around here and there on some pteranodons then upgraded to griffon's and then had to convert those mounts to undead mounts as the wizard of the realm took issue with outsiders controlling his "pets" and decided to kill them instead of letting the party use them. Hehe. Good times.

Wednesday, August 11, 2010
Oregon Trail : The Movie Trailer

The Oregon Trail : THE MOVIE!
Remember back to when you've given up on your dreams in Independence Missouri and outfitted your group with bullets and guns and headed out in your covered wagon in hopes to get to the promised land of Oregon, via the Oregon Trail! You'll face many dangers, snake bites, drowning, and of course the dreaded dysentery! Can you make it to Oregon or will you and your family end up like poop face? Only God knows!
For those of you who want to enjoy the original game here is a link to the Apple 2 emulator on the web where you can enjoy the Oregon Trail game in all of its 8bit glory! (its in the Apple 2 disk "O" section)
Also, if you haven't figured it out by now the above trailer is indeed a faux trailer. Hollywood isn't making this movie...yet! Actually I heard they were making "Sorry" based on the popular board game! hehe.
Hope you enjoyed this post and thanks for stopping by!

Monday, August 9, 2010
FREE Sky Tile Texture 8in x 10in
 |
| Sky Tile 1in. Grid 8in x 10in 300 dpi |
Friday, August 6, 2010
Sneak Peak : Elevation Game Board
While previously making my elevation markers I decided to create a elevation game board that was modular and could be configured in a number different ways. I remembered seeing something out on the market that used acrylic sheets in a 4x4 config and a box tube of varying lengths for various levels. I think the price was $40.00 for the set up.
Well my version cost drastically less, or at least I believe I created 4x the amount of space using the same amount of cash. I'll do a full write up soon but this is just a quick sneak peak(click on the pic below for full view):


The bases are a little more than 1/4 in thick and are very heavy durable acrylic. I have four of them and they are vary in size (which is why you see the paper doesn't go to the edge, they were from the "ends" box at taps plastic so were very cheap about $2.00 per base. I used the same dice boxes I used for the other elevation markers as a "sleeve" so another $1.00 the square tubes were just plain and came in 12 in sections (perfect) and cost another $1.00, and I just used a utility knife to mark them into 1 in sections. The acrylic play surfaces themselves were 5x5 in and cost $1.35 each as i got 8 for about $11 dollars. So for about the setup you see, its a $10.00 investment.
In the full on post you'll see all of the other different configurations I made. To glue everything together or actually "plastic weld" i used tap plastics acrylic cement which is water thin and actually melts the two surfaces together and creates a very, very, very, strong bond. The only thing that is "welded" is the dice boxes to the base and the dice boxes to the 5x5 sheets. I do this so I can slide in various box tubes for various heights (currently have 2 @12in, 2@6in, and 3 @ 4in) or use hollowed out dice boxes as spacers and have other "middle" play surfaces too. Then put all 4 bases together and you've got a huge 3d play surface.
Note also the cloud texture i used in the base is just taped on with packing tape so you can put any texture underneath, say water, space, air/clouds/, etc. (might be hard to see in the pic but there is a 1x1 grid on that cloud texture, and I also have a 1x1 in grid on a 5x5 in of transparency which is loose on the lower level.)
Again I'll add more detail in the full post, so keep watching the blog for the post!
If you have any questions or comments please leave them in the comment section below! Would love to hear your thoughts on how you work elevation into your games.
Hope you enjoyed this post and thanks for stopping by!
Wednesday, August 4, 2010
Player Kits
I found this post awhile back and thought it was a great idea! The post originated on the Heroscapers website from user winonavampire and he detailed out what a players kit contains for his heroscape games(which can be adapted to dnd/pathfinder or any rpg):
If you do this, or have similar ideas I'd love to hear about them! Feel free to place them in the comments below!
Player Kits:
I wanted to share with you guys something I have had for a while. I am the only one of my gaming group that has 'Scape. I am okay with that because the other guys have their games. I like being able to focus on a couple games so I don't have to buy every game. Anyway, being that I am the one who supplies all fun that is 'Scape, I put together "Player Kits."
They look like this:

They are actually Dentyne Gum Containers that start off like this:

I just peeled all the plastic wrapping off and you get a container like the blank ones you see above.
Lets take a peek into them...

As you can see, there is a bunch of 'Scapey stuff in there.
Here is the contents of each individual kit:

When I am setting up space to play, I set a kit at each seat. That way, everyone has their own set of materials. When the player is finished, they just scoop all their things back into the little jar, close it up and it is ready for the next time to play. I also have a large pool of extra wound counters, in case someone runs out, but 15-20 wound counters in each jar has been plenty so far.
In the case someone needs a special counter (Grenade, Experience Markers etc) those are kept in the individual compartment of the figures that use them. So, the grenade marker is kept in the Airborne Elite compartment etc. When they are done with the marker requirering unit, they just put the counter(s) back with the figs.
Other things I do to make the game easier and flow better:
I have a Reference Binder, which is just a 3 ring binger with top loaders containing every rule rook, scenarios, and the FAQ. (You can kinda see it in the background of the first pic)
Army Cards are kept in a CD Binder separated by General. Obviously commons are stacked together in the same slot. Bonding Squads and Heros are file next to each other, and like units are filed together (All marrow are next to each other, orcs, samurai etc.)As you can see a pretty slick idea using some tools from around the house. Depending on how well you know your group you could even customize these containers for each person. I have a small container with "community dice", though really you should buy a set of your own dice for your character. These community dice allow my players to grab an extra d6 or 10d6 to use for either back-stabs, fireballs, etc without having to rummage through their collection or ask people for their dice or to sit and roll 10d6 on individual rolls. So I could see creating a "player kit" for my wizard player and include the extra d6 she needs when casting her fireballs, a few extra d4's for magic missle etc. For my thief player I could see including a collapsible pen and a mini post it note pad to send me, the DM/GM messages on his alternative activities, etc. I think that would be a very cool thing to do for players. Now all I need to do is get rid of all that gum! ;)
If you do this, or have similar ideas I'd love to hear about them! Feel free to place them in the comments below!
Hope you enjoyed this post and thanks for stopping by!
Monday, August 2, 2010
D Total - 17 Dice In One Die!
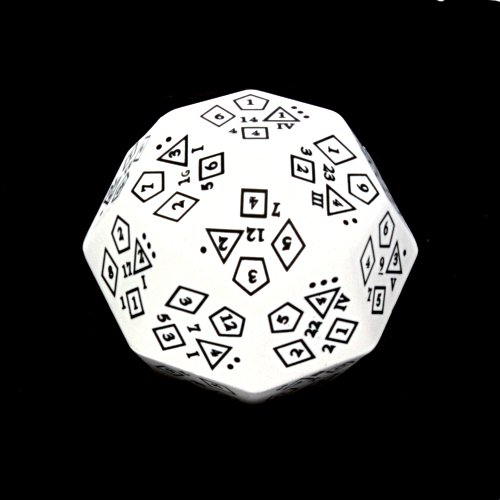 |
| d - Total : 11 Dice in one! |
The D Total works as 17 polyhedral dice in one. It'll act as a d2, d3, d4, d5,d6, d7, d8, d10, d12, d20, d24, d30, d40, d50, d60, d70, and d80. Its a awesome piece of plastic!
Lou Also gives you a quick overview of how to read the die for various rolls as well. Take a look:
Hope you enjoyed this post and thanks for stopping by!
Subscribe to:
Posts (Atom)