
 Check out the pic to the right! Those various colored hoops are made out of ordinary paper clips that I picked up at one of the "office" box stores for around $5-6 bucks. The pack I purchased contained 150 Jumbo(which are about 2in.) and 300 #2(which are 1in.) all coated in a vinyl sheath in the various colors you see. I made these using a few simple tools and they work great for marking miniatures during a game for various effects and conditions or to differentiate the same sculpture of a miniature when using multiples. They're also easy to use, and unlike colored magnets don't "raise up" your miniature if your suffering from many effects. So you're never standing 3 in. above the combat on a "pedestal".
They're also good for just plain movement in that they don't travel with your miniature! You can move your figure and try out various movements and your starting place is marked and only when you've committed you can then move the paper clip hoop. You won't have players, or yourself say "Where was I again?"
So I've included the instructions on how to bend the paper clips out and then to bend them with another simple tool, so that you get the most round shape with minimal kinks in the paper clips. So if you want to know more check out the instructions after the jump...
I'm sure i'm like a lot you when it comes to using miniatures in combat for dnd, pathfiner, or whatever rpg you play, that is you end up using whatever you have on hand that best represents the creatures the group of adventurers are facing. I actually have a ton of unpainted metal miniatures, unpainted plastic/resin figures, heroscape, heroclix, horrorclix, and mageknight figures and use various figures when i'm DM'n. Some of the figures I've used for large numbers of creatures are sometimes all the same model.  Case in point this pic to the left which I posted a little while ago on this blog. It shows the prep I did for our last session of dnd/pathfinder. All those figures are actually from the collectible figure game called mageknight. I had the time to actually number these figures with a cut up post it note and a sharpie. If I didn't have time I would have used the hoops above to differentiate the various sculptures from each other by just placing the hoops over the figures or hanging them off an appendage. As it turned out I used the hoops for marking characters who were dazed, prone, on fire, etc. which is really what I like to use the hoops for. If you have a condition or state that is "out of the ordinary" you can alway cut a post-it note and wrap the paperclip with the post-it note to create a mini flag where you can write the wacky condition upon.
Alright so you're wonder how I made such lovely round hoops with little to no kinks in them, and the ordinary tools I used? Sure you are! Ok here's the scoop: (I've used the captions to describe the process)
 |
| These are the exact paper clips I used along with a few other colors I bought individually. I think they are from OfficeMax. |
 |
| This is the Jumbo sized paper clip I used, the smaller ones can be used but are a little more difficult to work with. Try and get the kind with a vinyl sheath instead of just colored metal as they won't harm your miniatures if they hit them or get hung up on a sword, staff, or shield. |
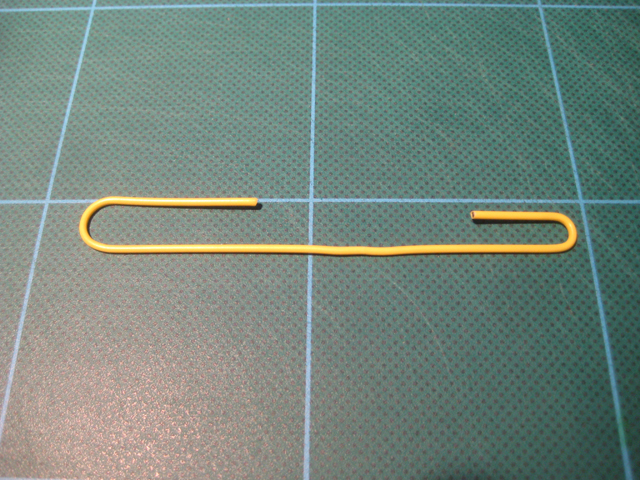 |
| Just use your fingers and bend paper clip in two to "open" the paper clip up you should have the same thing as the image above, a double sided hook. |
 |
| Then bend the larger sided hook "open" so now you have a long single hook, if you do it right you should have a hook with minimal kinks in it. |
 |
| Now comes time for an actual tool. This is an acrylic rod, you can find them at a craft store typically in the polymer clay section. You can also go to Taps Plastic or similar store and also find a suitable tool. In a pinch just hit the hardware store and grab a 1in. piece of pvc pipe. Its the size you're looking for that matters. If you want larger or smaller markers/hoops then get the proper sized pipe/rod. |
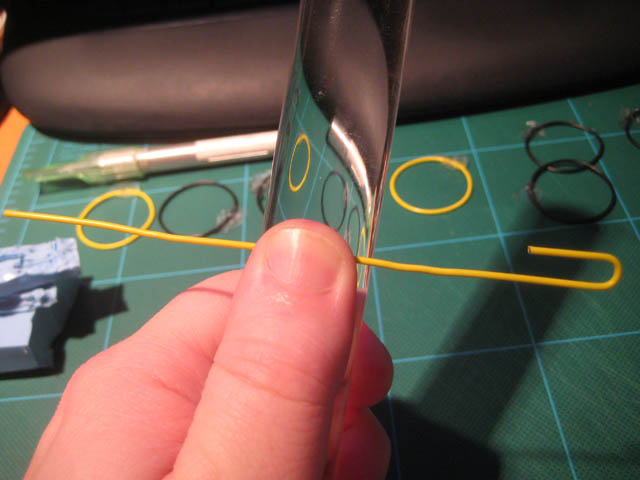 |
| Place the hook you made and center it on your acrylic rod. Secure it with your thumb |
 |
| Now just bend the two ends toward each other keeping your thumb securely located in the center and acting as the bend point. It might take a bit of effort, but gradual bends will insure a smooth hoop. |
 |
| If you do it correctly and your paper clip is large enough it'll wrap around. If not just secure one end with your thumb and continue to wrap the other side, which is why we left the one hook in place to act as a handle. Wrap it so that its as tight of a circle as possible. |
 |
| Now you should have something like this, a nice tight circle, which brings us to our next tool. |
 |
| These are some straight cut nippers. I use these instead of angled or offset nippers as those tend to slide over each other or can't handle cutting through paper clips, especially the ones from hobby companies such as games workshops which are more for plastic sprue cutting not metal cutting. You can pick up a one handed version like you see here for under $10 at a hardware store and they'll last forever. |
 |
| See how smooth that circle is, hardly any kinks at all. Now all you need to do is determine where you're going to cut the ends off. See where they overlap? Pick a spot along that path and nip the top portion of the paper clip. I'd recomend you wear eye protection at this point AND hold on to both portions of paper clip as the nipping process can send a piece flying across the room or worse right at your face or eyes! |
 |
| This is what you should end up with! That's it! Now you could just wrap it with some tape (don't bother with electric tape it won't stay affixed) or you could use some heat shrink tubing but they don't come in many colors, or do what I did and use hot glue to seal that seam up. I made a jig to glue it together but you could just use some parchment paper from the grocery store and a drop of hot glue since hot glue won't stick to parchment paper. |
 |
| This is the jig i made. I just placed one of the hoops on the one half used a sharpie to trace and an hobby knife to cut the channel. This "block" is a piece of silicone rubber that I had left over from a mold I made. Hot glue won't stick to silicone so its perfect for this type of work. |
 |
| One little dab of hot glue in the center. |
 |
| Quickly place your "hoop" into the jig with the seam in the center of the hot glue. |
 |
| Quickly place other half of block onto the hoop and hot glue. Wait for about 30 seconds for the heat to dissipate and the hot glue to set up. You might have to wait longer after a few as the silicone somewhat retains the heat for a bit. |
 |
| Once cooled you'll have something like this, a little excess glue and the joint sealed good and tight. |
 |
| Here it is out of the jig. Kind of looks like a right with a diamond or stone that just melted away. hehe. |
 |
| A quick slash with the hobby knight takes care of the excess glue! |
Oddly enough now that I'm proficient in soldering you could if you have the tools also solder the joint but the hot glue did the job and didn't cover up any of the color!
Well hopefully this will encourage you into making your own conditions, effects, whatever markers, if you try larger sizes or have other techniques that worked for you please leave them in the comments below to share with the rest of the community! I look forward to seeing others work!
At some point I'll have another post for my method for creating burst, blast, spell radius, whatever markers too!
Hope you enjoyed this post and thanks for stopping by!

No comments:
Post a Comment