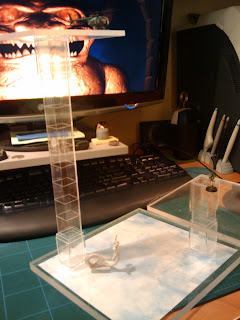
While previously making my elevation markers I decided to create a elevation game board that was modular and could be configured in a number different ways. I remembered seeing something out on the market that used acrylic sheets in a 4x4 config and a box tube of varying lengths for various levels. I think the price was $40.00 for the set up.
Well my version cost drastically less, or at least I believe I created 4x the amount of space using the same amount of cash. I'll do a full write up soon but this is just a quick sneak peak(click on the pic below for full view):
The bases are a little more than 1/4 in thick and are very heavy durable acrylic. I have four of them and they are vary in size (which is why you see the paper doesn't go to the edge, they were from the "ends" box at taps plastic so were very cheap about $2.00 per base. I used the same dice boxes I used for the other elevation markers as a "sleeve" so another $1.00 the square tubes were just plain and came in 12 in sections (perfect) and cost another $1.00, and I just used a utility knife to mark them into 1 in sections. The acrylic play surfaces themselves were 5x5 in and cost $1.35 each as i got 8 for about $11 dollars. So for about the setup you see, its a $10.00 investment.
In the full on post you'll see all of the other different configurations I made. To glue everything together or actually "plastic weld" i used tap plastics acrylic cement which is water thin and actually melts the two surfaces together and creates a very, very, very, strong bond. The only thing that is "welded" is the dice boxes to the base and the dice boxes to the 5x5 sheets. I do this so I can slide in various box tubes for various heights (currently have 2 @12in, 2@6in, and 3 @ 4in) or use hollowed out dice boxes as spacers and have other "middle" play surfaces too. Then put all 4 bases together and you've got a huge 3d play surface.
Note also the cloud texture i used in the base is just taped on with packing tape so you can put any texture underneath, say water, space, air/clouds/, etc. (might be hard to see in the pic but there is a 1x1 grid on that cloud texture, and I also have a 1x1 in grid on a 5x5 in of transparency which is loose on the lower level.)
Again I'll add more detail in the full post, so keep watching the blog for the post!
If you have any questions or comments please leave them in the comment section below! Would love to hear your thoughts on how you work elevation into your games.
Hope you enjoyed this post and thanks for stopping by!


No comments:
Post a Comment